
Isn't it nice if you can get a SMS Alert for a failure in ESB server?
In this post I am discussing how we can send a SMS Alert for a system failure in WSO2 ESB.
Required materials
* Axis2 SMS Transport binary. (download from here)
The Axis2 SMS Transport enables SMPP protocol support for Axis2. It allows Axis2 to connect to a SMSC and send/receive sms. Apart from that it also has a GSM implementation which we can use to connect to a modem and send/receive sms over it.
Please visit [1] for more information.
* JSMPP 2.1.0 binary (download from here)
JSMPP is a java implementation of SMPP protocol. It provides an API to communicate with a SMSC.
Please visit [2] for more information.
* A SMSC Simulator
SMSC Simulator is an application which can be act like a SMSC. Using a simulator we can test our scenario without having access to a real SMSC. For the real production servers we have to use a real SMSC. A simulator is good enough for us for now. I am going to use logica SMSC Simulator for this tutorial.
Download and setup the Simulator following the instruction given at [3].
Now let's move on to the steps.
Step 1
Copy following libraries to $ESB_HOME/repository/components/lib directory.
axis2-transport-sms-1.0.0.jar
jsmpp-2.1.0.jar
Step 2
Enable SMS Transport by adding following configuration under “Transport Senders” section in axis2.xml.
axis2.xml is located at $ESB_HOME/repository/conf/axis2 directory in WSO2 ESB 4.5.x.
    esb1
    esb123
    localhost
    2775
    ESB1
Please refer to [1] to find more details on above parameters.
Step 3
Goto SMSC Simulator directory. You should have following 3 files at there.
smpp.jar
smscsim.jar
users.txt
Edit the users.txt file and add following name-value pairs to it.
name=esb1
password=esb123
timeout=unlimited
Note that ‘name’ is the ‘systemId’ parameter which we have specified at sms transport sender configuration.
Start SMSC Simulator by executing the following command.
java -cp smpp.jar:smscsim.jar com.logica.smscsim.Simulator
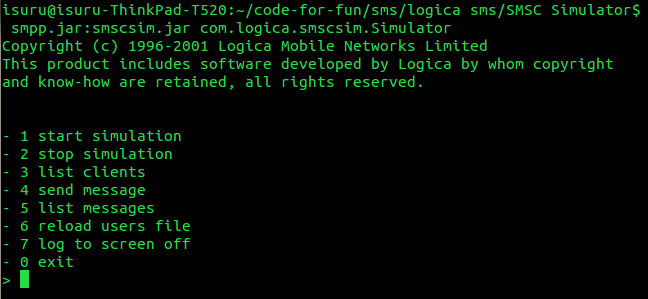
Enter 1 for the prompt to start simulation.
Enter 2775 as the port number. Note that it is equal to the port which we specified in sms transport sender configuration.
You will see the “Starting listener... started.” log on the console.
Now leave the SMSC Simulator running and let’s go back to configure the ESB server.
Step 4
Start the ESB server and create a proxy service with the following configuration.
$1
Let me describe the proxy service configuration in brief.
This configuration is very much similar to the ESB sample 150 configuration [4]. The only difference is, this has a fault sequence specified.
Fault sequence is triggered whenever some failure occurs in the mediation flow.
Here at the fault sequence, we are constructing the message which is to be sent as a SMS using the payload factory mediator.
Error message is extracted and set to the sms body from the ERROR_MESSAGE property.
Finally message is sent over sms transport using an Address Endpoint having the following uri.
sms://94777179968"
94777179968 is the phone number which sms has to be sent.
Step 5
Now let’s run and see how this scenario works.
Start the sample Axis2 server and deploy the SimpleStockQuoteService.
Please refer to [5] for find how to do it.
Now let’s execute the stock quote client by requesting for a stock quote on the proxy service as follows:
ant stockquote -Daddurl=http://localhost:8280/services/StockQuoteProxy
You will see the following log get printed on the Simple axis2 server console.
samples.services.SimpleStockQuoteService :: Generating quote for : IBM
And following get printed on the sample client shell.
Stock price = $98.58846106288853
So that is the success case.
Step 6
Now let’s stop the sample Axis2 server and execute the client again.
ant stockquote -Daddurl=http://localhost:8280/services/StockQuoteProxy
Since sample Axis2 server is not running, SimpleStockQuoteService will not be available at this moment. So the Endpoint will get suspended and the fault sequence will get executed.
A sms containing the error message will be sent to SMSC server.
You will see the following log get printed on the SMSC server.
08:35:05 [sys] new connection accepted
08:35:05 [] client request: (bindreq: (pdu: 33 2 0 1) esb1 esb123 52 (addrrang: 0 0 ) )
08:35:05 [esb1] authenticated esb1
08:35:05 [esb1] server response: (bindresp: (pdu: 0 80000002 0 1) Smsc Simulator)
08:35:05 [esb1] client request: (submit: (pdu: 204 4 0 2) (addr: 0 0 ESB1) (addr: 0 0 94777179968) (sm: msg: Alert..! Error In StockQuoteProxy, Connection refused or failed for : localhost/127.0.0.1:9000, IO Exception occured : Connection refused) (opt: ) )
08:35:05 [esb1] putting message into message store
08:35:05 [esb1] server response: (submit_resp: (pdu: 0 80000004 0 2) Smsc2001 )
In the SMSC command prompt enter 5 to view list of messages.
You will see the sms sent from the ESB server as follows.

For this post I have used the SMPP implementation of Axis2 SMS Transport. You can use the GSM implementation of it also to test this. Please refer to blog post[7] written by Charith to find how to use GSM implementation. And also he has written a comprehensive post [8] on Axis2 SMS transport.
[1] http://ws.apache.org/commons/transport/sms.html
[2] http://code.google.com/p/jsmpp/
[3] http://opensmpp.logica.com/CommonPart/Introduction/Introduction.htm#simulator
[4] http://wso2.org/project/esb/java/4.0.3/docs/samples/proxy_samples.html#Sample150
[5] http://wso2.org/project/esb/java/4.0.3/docs/samples_setup_guide.html#Starting
[6] http://wso2.org/project/esb/java/4.0.3/docs/samples_setup_guide.html#Using
[7] http://charithwiki.blogspot.com/2009/12/invoking-webservices-using-axis2-sms.html
[8] http://charithwiki.blogspot.com/2009/06/axis2-sms-transport.html


